Pages

Tampilkan postingan dengan label controller. Tampilkan semua postingan

Rabu, 04 Mei 2016

Linduino USB Isolated Arduino Working With DACs and ADCs

Linear Technology products, including ADC & DAC
So a lot of microcontroller (MCU) topics I write about in this blog are mini-research projects for me, because Im new to MCUs and to electronics in general. Through my research I get to learn more about MCUs and how theyre used, and, with a little luck, you get to be informed or amused, or both, by the posts here. But todays topic, Linduino, DACs and ADCs, is even further than normal from my experience and knowledge base, so this post will just give you an overview of the Linduino board from Linear Technology.

"Linduino is a USB-isolated Arduino," an August 11 post on EDN.com, caught my interest because of the *duino name and because the post mentioned applications involving temperature sensors (Humboldt MCU Garden project), audio systems (Humboldt Laser Harp and other music-light instruments) and car systems (Ed Smith is a great resource for vehicle-related MCU projects, possibly something with on-board diagnostics, or OBD). Familiarity with the Linduino board isnt required to do any of the aforementioned Humboldt MCU projects, but at some future point a Linduino could provide major benefits for us. If nothing else, it would be worthwhile to connect with some of the *duino people at Linear Technology, the manufacturer of the Linduino, to expand and strengthen the statewide and worldwide network of the Humboldt MCU community. Plus, their headquarters are in Milpitas, California, so maybe theyll get the urge to drive north behind the redwood curtain and participate in a Humboldt Microcontrollers Group meeting or a Humboldt Makers meeting!
Linduino board

Onward to tech specifics about Linduino. The EDN blog post mentioned above says:
"My pals over at Linear Technology have developed the Linduino board to drive their ADCs (analog to digital converters) and DACs (digital to analog converters) as well as temp sensors and other devices...in addition to the normal shield headers on an Arduino, there is a header that Linear Tech has used for years to drive their demo boards. This computer interface function used to be done with their DC590 interface board. Indeed, the firmware that comes shipped with the Linduino emulates that board, so you can run the original Linear Tech interface program on your PC...The Linduino board will accept all the shield mezzanine boards for Arduino, but has this extra header to control Linear Tech demo boards...Linear Tech also used one of their USB isolators on the Linduino board. This means that the board and what you plug into it are galvanically isolated from the computer you have the USB plugged into. This means you can measure things off a car or an audio system without worrying about ground loops polluting the measurement...Since Linear Tech is also a power supply chip company, they beefed up the power supply on the board, using a switching regulator to replace the linear regulator on the Arduino. This means you can get 750mA out of the power system. Since a USB can’t supply this much power, that means you have to feed the board with an external wall wart. Now you have the power to drive actuators or other heavy loads..."
Were in the early stages of refining the Humboldt Laser Harp, and depending how deep we get into developing the Humboldt family of laser harps and other light-music MCU instruments, there may come a time when well need, or at least want, a board that can be used on "an audio system without worrying about ground loops polluting the measurement." Thats one of the reasons I am interested in the Linduino board.

The main Linduino webpage has lots of info and links about the board, including several internal blog posts and an overview video about Linduino. Since getting two viewpoints about what the board is and does might help you better understand its value, heres the Linear Technology webpage description of what Linduino is:
DC2026A-KIT
"Linduino is Linear Technology’s Arduino compatible system for developing and distributing firmware libraries and example code for Linear Technology’s integrated circuits. The code is designed to be highly portable to other microcontroller platforms, and is written in C using as few processor specific functions as possible. The code libraries can be downloaded by clicking the Downloads tab above and used as-is in your project or individual code snippets may be viewed in the Code section of a supported part. The Linduino One board (Demonstration Circuit DC2026A) allows you to test out the code directly, using the standard demo board for the particular IC. The Linduino One board is compatible with the Arduino Uno, using the Atmel ATMEGA328 processor. This board features a 14-pin “QuikEval” connector that can be plugged into nearly 100 daughter boards for various Linear Technology parts, including Analog to Digital converters, Digital to Analog Converters, high-voltage power monitors, temperature measurement devices, RF synthesizers, battery stack monitors, and more."
Humboldt Laser Harp and Ed Smith
Linduino is not inexpensive, so participants of the Humboldt Microcontrollers Group wont be buying them on a whim like a $3 Arduino Micro clone from China. But if someone has a genuine need for the board, especially a business-related, revenue-generating need, it would be good to know its available. You can order the board from this Linear Technology page, and there are two options. One option is the DC2026A-KIT for $125, and the other is just the DC2026A board for $75. Digi-Key, Newark and Arrow are also distributors for Linear Technology.

So now you have a general idea of what the Linduino board is and can do, and youve got links above that lead to more info about this member of the continually-expanding *duino family. Ill have to check in with Ed Smith to find out exactly what value this tool might have for us while working on the Humboldt Laser Harp, the Humboldt MCU Garden or any other MCU projects our MCU group or maker group gets involved with.

**********
Read More..

Sabtu, 30 April 2016

Arc Controller Motor Shield More Power!!

The August 21 article "Arduino Motor Shield, Arc-Controller Launched By Arc Robotics" gave me a good reason to do a little research on microcontroller (MCU) motor control and motor shields.
Arc-Controller motor shield

The article covers the Arc-Controller, a new high capacity motor shield that has a Kickstarter campaign in progress, telling us:
"Maker, developers and hobbyists that enjoy building Arduino platform based projects might be interested in a new Arduino Motor Shield called the Arc controller which has been created by Arc Robotics...“There have been a lot of amazing projects come out of the Maker revolution, however, many are limited by the capability of their motor controller. We want to change that. The Arc-Controller is a bridge to bring high Amp motor control to your projects, up to 43 amps with a heat sink. It is capable of variable speed and direction control over a single Stepper Motor or two DC motors, because when do you only need one motor. The Arc-Controller is compatible with about any Arduino, or other micro controller such as Raspberry Pi. It runs an ATMega328, and is user programmable via the Arduino IDE."
The Kickstarter campaign still has 36 days to go, but it has gotten off to a very slow start, with only $927 pledged of the $41,500 funding goal. According to the Arc-Controller Kickstarter page,
"The Arc-Controller built around two H-Bridges. Each one can supply 43 amps of continuous current, with a properly mounted heat shield. The dual H-Bridges run separately, controlling two high-end DC Motors or as one controlling a single stepper motor. Built into the H-Bridges are current and temperature fail-safes.  If they begin to get too hot, or if they exceed the maximum current levels, current limiting will take affect. They will automatically shut down until they cool off, or until conditions are safe to operate. We also have included a reverse polarity protection...There is an integrated circuit on board that gives a current reading from the H-Brides to see how much current each individual motor is using. This gives you the option to write your sketches to react under certain loads, detect shorts and over heating states...We are creating a simple library that can be used to easily send commands to the Arc Controller. These commands can configure the Arc Controller to run a stepper motor, drive two brushed DC motors, and even an integrated an XY thumb stick “Arcade Drive”. The interface library will take input from you and transmit it to any number of connected Arc Controllers...We have had lots of success with tank style robots to the point that we made it run on two wheels until you want it to act like a tank. then it will lay down and drive like a tank. We have many theoretical uses, that we are eager to try such as: home made Segways, drive-by-wire go-karts, RC lawn mowers..."
There are a fair number of existing motor controllers for Arduinos if the Arc-Controller is overkill
for your needs. Here is a sampling of whats available for Arduino:
Adafruit motor shield V2
  1. Adafruit Motor Shield V2 for Arduino -- $19.95 -- "We kept the ability to drive up to 4 DC motors or 2 stepper motors, but added many improvements...Instead of a L293D darlington driver, we now have the TB6612 MOSFET driver: with 1.2A per channel and 3A peak current capability. It also has much lower voltage drops across the motor so you get more torque out of your batteries...Instead of using a latch and the Arduinos PWM pins, we have a fully-dedicated PWM driver chip onboard. This chip handles all the motor and speed controls over I2C...5 address-select pins means up to 32 stackable shields: thats 64 steppers or 128 DC motors!"
  2. Pololu Dual MC33926 Motor Driver Shield for Arduino -- $29.95 -- "This shield makes it easy to control two brushed DC motors with your Arduino or Arduino-compatible board. Its dual MC33926 motor drivers operate from 5 to 28 V and can deliver a continuous 3 A per motor. These great drivers also offer current-sense feedback and accept ultrasonic PWM frequencies for quieter operation."
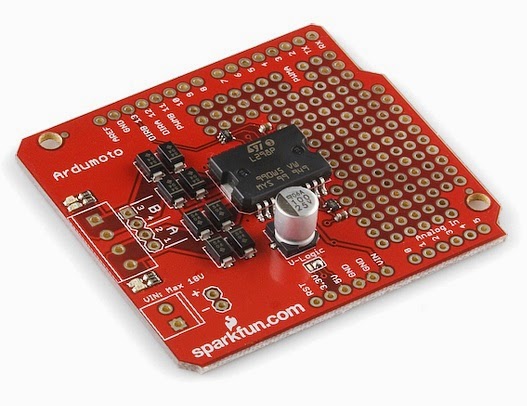
  3. Ardumoto - Motor Driver Shield -- $24.95 -- "This is a motor shield for Arduino that will
    Ardumotor from SparkFun
    control two DC motors. Based on the L298 H-bridge, the Ardumoto can drive up to 2 amps per channel. The board takes its power from the same Vin line as the Arduino board, includes blue and yellow LEDs to indicate active direction, and all driver lines are diode protected from back EMF
    ."
  4. Monster Moto Shield -- $69.95 -- "This is essentially a ramped up version of our Ardumoto motor driver shield. For this monster shield we’ve replaced the L298 H-bridge with a pair of VNH2SP30 full-bridge motor drivers. We’ve also beefed up the support circuitry so this board is capable of driving a pair of high-current motors!"
  5. EasyDriver Stepper Motor Driver -- $14.95 -- "The EasyDriver is a simple to use stepper motor driver, compatible with anything that can output a digital 0 to 5V pulse (or 0 to 3.3V pulse if you solder SJ2 closed on the EasyDriver). EasyDriver requires a 7V to 20V supply to power the motor and can power any voltage of stepper motor."
If you use large motors or lots of motors on your MCU projects and could really use the Arc-Controller, you may want to head over to their Kickstarter page and support their campaign. If you know of other motor shields that do pretty much the same thing, send an email to arcatabob (at) gmail {dott} com and let me know what you use or recommend, and Ill update the post with that info.

**********
Read More..

Kamis, 07 April 2016

Solar Energy And Arduino Solar Charge Controller

Theres an intriguing microcontroller (MCU) project in an August 8 article on Design News titled "Gadget Freak Case #260: Arduino Solar Charge Controller." I havet read a lot about solar energy and Arduinos, or any other MCUs, so I took a closer look at the article.
Residential active solar energy system (from Wikipedia CC)

Many Humboldt County people seem interested in solar energy, although the often-foggy or cloudy climate of Arcata, Eureka, and other coastal communities isnt as well suited to solar energy collection as the climate of New Mexico or Arizona cities. However, it is still good to be experienced with technologies used outside the North Coast, and there are plenty parts of Humboldt County not immersed in marine fog banks or redwood forest mists. For this reason it would be useful for participants in the Humboldt Microcontrollers Group to know the basics of active solar energy systems and to have experience with the electronic components and operation of those systems. The topic of the Design News article above isnt an inexpensive basic active solar energy system, but I think Ill do some research regarding different types of inexpensive systems for a future group project.
Solar charge controller schematic from CirKit.com

The solar charge controller that is the topic of this post is located between the solar energy collection device and the energy storage system, usually a battery. The controller regulates both the voltage and the current going to the energy storage system from the energy collection device. The schematic at the right from CirKit.com shows the general concept (although that schematic is not from Gadget Freak project). The Design News article describes the function of the Arduino this way:
"This gadget uses Arduino to control the whole process and takes a voltage reading from the solar panel and the battery to be charged. Then, according to voltage levels on either side, it charges the battery using PWM control signal. Energy flow is driven with MOSFET transistors that ensure low energy loss. The charging controller is equipped with basic filters on both the battery side and the solar panel side. It is also equipped with things like overcurrent, overvoltage, PV panel reverse current, auto load disconnection, and overcharge protection."
Gadget Freak #260: solar charge controller (Design News PDF)
The solar charge controller build instruction PDF is linked to in the article, and seems like a good quality document. It has pictures, circuit drawings, Arduino code, and the type of helpful tips that many project documents do not include. An example of the helpful tips is where the project creator describes how to choose MOSFETs. For people who arent already familiar with MOSFET properties and how theyre used, he says this about drain source voltages for MOSFETs:
"When the MOSFET is turned off, the whole supply voltage will be measurable across it, so this rating should be larger than your supply voltage to provide sufficient protection so that the MOSFET does not fail. The maximum voltage a MOSFET can handle varies with temperature."
He also talks about whether to use an n or p channel MOSFET, continuous drain currents, thermal loss, gate threshold voltage and more. Tips like this are especially useful to people like me who are new to microcontrollers.

In months and years to come, it is my hope that the Humboldt Microcontrollers Group will build many MCU devices and systems. Nicks automated chicken coop door is the first one, as far as I know, and the Humboldt Laser Harp is the second, I think. It would be great if we can develop and put online as much information as possible about these MCU projects, assuming theyre not going to be commercialized so they can earn us millions. Or even thousands. Anyway, part of gathering, organizing and publishing this MCU project information should be a good documentation format. There are many possible formats, but the Gadget Freak build instruction PDF used in the solar charge controller project seems like a good place to start if someone in the MCU group doesnt have a different project information format they prefer.
Gadget Freak (from Design News and Allied Electronics)

This Gadget Freak topic appears to be a regular feature of the Design News website. This solar charge controller is labelled #260. I dont know if that means there are 259 previous Gadget Freaks, but here are links to The Best of Gadget Freak Volume 1 and The Best of Gadget Freak Volume 2. Design News collaborates with Allied Electric, and they invite you to submit your electronics projects for publication. This is just one more way that people in the Humboldt MCU community can participate in the expanding world of microcontrollers and possible earn a few bucks. The Gadget Freak page on Allied Electrics site says:
"Are you a Gadget Freak? Allied Electronics and Design News would like to send you a check for $500 to spend at alliedelec.com or anywhere you please! Submit your design for a gizmo or gadget that any Gadget Freak would appreciate, and you just might win! If your project is selected, you’ll receive a $500 check from Design News and will be featured in an upcoming issue of the magazine with your invention. In addition to the $500 awarded for being selected as a Gadget Freak, all selected gadgets...will be included in the Gadget Freak of the Year contest. Starting in November, the readers of Design News will then vote on the best gadget...The winning gadget will receive an additional $6,000 with two runners-up who will receive $2,000 each."
If youve built solar energy devices or systems with MCUs, it would be great if you came to one of the every other Thursday meetings the MCU group has. The next meeting will be on Thursday, August 24. If you cant make it to the meeting but would be interested in discussing your solar energy device or system, please email me at arcatabob (at) gmail {dott} com
. It would be great to meet you for coffee and a tech discussion, or possibly youd be willing to show the MCU group your MCU in operation!

**********
Read More..

Sabtu, 26 Maret 2016

MCU Music Home Multi zone Arduino Audio

Members of the Humboldt Microcontrollers Group have a more than average interest in microcontrollers (MCUs) and music, e.g. the Humboldt Laser Harp (HLH) and Raspberry Pi music systems.

Weve got the proof-of-concept HLH working, but we need to take the next step in expanding the musical capabilities of the HLH. After I talk with Ed, Nick and others in the MCU group about how to most cost effectively improve the music from the harp, Ill write a post about electronic music component options. In the meantime, heres an MCU music topic I read about in an August 2014 Atmel blog post.
Custom PCB fabbed by OSH Park

The Atmel post points to an Instructables titled "The Smartphone Operated House-Wide Audio System" that talks about a system that:
"...solves the seemingly ubiquitous problem of being able to listen to your music from anywhere in your house. Say goodbye to a separate iPod dock in each room! This instructable will show you step-by-step how to build a house wide, multi zone audio system which can be entirely controlled from your Smartphone or computer (really anything with a web browser) from anywhere in your house which you have a Wifi connection...its also expandable to however many zones you need...this system allows you to use speakers and amps of your choosing and at a fraction of the cost of a Sonos system. In this project we will be making use of an Arduino uno with an ethernet shield and a custom PCB which can be ordered from your favorite PCB manufacturer (I recommend OSH Park). The central component of the PCB is the PT2258 IC. This IC allows for volume control of 6 audio channels and communicates with the Arduino over the I2C bus."
Arduino with Ethernet shield and custom PCB with PT2258 IC
The Princeton Technology datasheet for the PT2258 IC shows the block diagram and pin configuration for this component. Reading over the Tutorialsto.com write-up about the IC will give you a general understanding of the component if you dont already know what it is.

Lepai LP-2020A+ amplifier
This MCU project is more complicated than some projects in other posts Ive written, but it will give you good experience in doing activities like ordering a custom PCB (printed circuit board), soldering components on the custom PCB, and hooking up your fabbed and assembled custom PCB with a 6-channel amp and power supply. The Instructables has a pretty good set of photos showing how to solder the components on the PCB, so dont worry about that step if you havent assembled many, or any, PCBs. The two amplifier options listed in the project write-up both look fun to work with; a Lepai LP-2020A+ for about $20 or a Parts Express AA-AB34181 for about $60.

The Instructables project author describes using the finished audio system this way:
Parts Express AA-AB34181 amplifier
"In order to maintain the idea of being able to control the system from a smartphone, I used a Chromecast with an HDMI audio extractor. This allows us to take the audio the Chromecast outputs and plug it into our PT2258 control board. Thus we can simply cast our favorite Pandora station or music from Google Play Music to the Chromecast and control the volume from our Arduino. Simply plug the Chromecast into a TV and set it up on your home network, then unplug it from the tv and plug it into the HDMI audio extractor. Using a RCA to 3.5mm cable, plug the HDMI audio extractor into the input of the PT2258 board...The system can be controlled by anything which has a web browser and is connected to your home network. All you have to do is type in the IP address of the arduino followed by "/?app" (i.e. 192.168.1.199/?app) and you will be brought to the control app for the system...The greatest limitation of this system is the fact that there is only one audio input for the entire system. That means you have to listen to the same song throughout the entire house."
This system costs about $300 to build, so I wont be putting one together any time soon, but the project gives a good overview of setting up a pretty versatile home audio system from scratch.

**********
Read More..