Pages

Tampilkan postingan dengan label nasa. Tampilkan semua postingan

Senin, 30 Mei 2016

NASA Spaceship And Mission Control Desk

Spaceship in bedroom
You have to watch this video of a homemade NASA spaceship and Mission Control desk, part of which is controlled by an Arduino.

The above video is featured in the June 26 "Making Fun: Kid’s Room Spacecraft" post on the Make magazine website. The Mission Control desk featured in the above video and Make post was highlighted in a February 19 Make post, "Making Fun: Mission Control Desk," and was explained in this video. If you liked the video and are interested in details of how Jeff built some of the parts, make sure to read the two posts linked above.

After watching that spaceship video, I was both inspired and embarrassed. Inspired by the awesome job Jeff Highsmith did of building the Mission Control desk for his sons, then later building a NASA spaceship thats linked to the Mission Control desk.
Control panel in spaceship

As someone interested in learning about microcontrollers (MCUs) and about building things with MCUs, I was very much inspired by the variety of switches, lights, controls and realistic panels on the amazing desk and spaceship that Jeff built for his sons. As an engineer I was also inspired when he said in the video, "I put in an iPhone dock for future expansion. For now it will just play video from NASA, but in the future I plan to have some homemade satellites to monitor." I dont know if he meant homemade satellites that hang from the ceiling of his sons room, or if he is figuring that in a few years, there will be civilian satellites and he plans to have one or several of those civilian satellites be his. Either way Im sure his expanded system will be cool, and his sons will have a great time with
Mission Control desk
the desk, the spaceship, the satellites and other additions Jeff and the boys make to their private space program. Can you imagine how much those two boys are going to know about electronics and building stuff by the time they reach high school!

Now to the embarrassing aspect of the Highsmith Space Program. Im a bit embarrassed I never made anything half as cool as that for my kids. Im also a bit embarrassed that the Humboldt Microcontrollers Group hasnt come up with a really unique and interesting project that four or more people want to put a bunch of knowledge and skill into that will make people who see it say, "Whoa, thats really awesome!"

There are a couple things that I want to do a little differently as a result of watching Jeff Highsmiths videos and reading his Make magazine posts about the Mission Control desk and the spaceship.
Payload bay remote camera monitor

The first thing to do differently with MCU projects is to think big while paying attention to details. Jeff appears to have had a big picture idea of what he wanted for his sons -- starting with a homework desk that can convert into a NASA Mission Control desk, then extending the space theme to his other sons bedroom with a spaceship. But what makes the desk and spaceship fantastic accomplishments is the close attention to the details. The control panels have complex and extremely realistic looking labels, switches, lights and controls. To make the experience authentic for his kids, Jeff incorporated recordings from NASA and simulations of actual astronaut problems. I realize the only way to tackle a large project is to break it down into small steps, but you have to have a good picture of what the large project will look like, and you have to pay attention to the small steps. When you know the big picture, and youre taking care of details, then commitment and perseverance have to kick in.

Mission status light panel
So, for the Humboldt Laser Harp and the Electronic Light Orchestra, the Humboldt Microcontrollers Group should discuss, agree on and document what the big picture is. How much time and effort do people want to put into that project. Next we should get more specific, more detailed on the finer points of what wed like the Humboldt Laser Harp to look like and to do from both a music and a lighting standpoint.

The second thing to do differently on MCU projects is taking more photos and videos at each stage of a project, planning ahead of time the shots to capture for each project. Jeffs videos have excellent documentation of building the desk and spaceship. I became less embarrassed but no less inspired when I read that Jeff is a full-time videographer. That explains thinking things out enough ahead of time that he captured cool construction sequences while he was building the projects. It would be really good if the Humboldt MCU group could find a videographer or two who are interested in MCUs and electronics and would like to participate in the groups activities. They would know how to capture the story of a project, and theyd be able to put together a cohesive and impressive video.
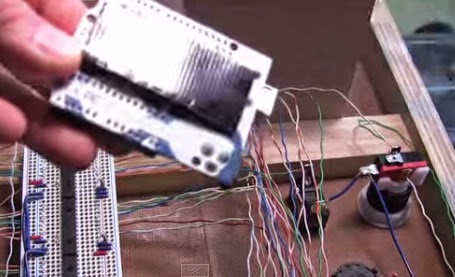
Ardunio used to control instrument panel

I think Ill keep a link to Jeffs spaceship video handy and watch that regularly to keep me inspired and to remind me of how rewarding completion of a big, complex project can be.

**********
Read More..

Rabu, 20 April 2016

Make Your Arduino Go Fast A Modern Go kart

Electric Arduino Go-kart (from Instructables)
As the Hackaday post "Electric Go-Cart Has Arduino Brains" says, most modern vehicles have lots of their functions controlled by computers (or microcontrollers / MCUs). The 2014 go-kart thats the subject of this post is truly a modern vehicle in that respect.

And...the go-kart will make your Arduino go pretty fast. In MPH, not GHz.

I first saw this go-kart mentioned on Google News in the Unocero article "Un Go-Cart eléctrico que usa Arduino," so if your native language is Spanish, you may want to read that version of this tech story. Google News is nice that way, because sometimes I see a non-English article that lets me know about a story Id not have read if it wasnt in English. Google Translate certainly is not perfect or even almost perfect, but it usually gives a usable version of the article, and you can do more Googling based on the Skynet-translated version of a non-native language article.
Steering wheel showing LCD screen (from Instructables)

It appears the source of the story about this Kartduino is the "Electric Arduino Go-kart" Instructable done by a 15-year old from California. The Instructables write-up presents some of the technology used to build the go-kart, but it cautions the reader that its not a complete guide to building the vehicle. Heres a taste of the write-up:
"The drive setup uses a Hobbywing Xerun 150A brushless electronic speed controller to control a Savox BSM5065 450Kv motor. Batteries are 3x zippy lithium polymer - 5 cells, 5000mah. The motor has two large fans I pulled out of an old computer for cooling, mounted right over the motor. The chain drive is a 1:10 overall ratio, using a 15 tooth on the motor chained to a 30 tooth on the jackshaft, and a 9 tooth from the jackshaft to a 45 tooth on the wheel. The tires are 10" diameter so at 20 volts the top speed is around 30 mph. The ESC is controlled via PWM from the arduino. A throttle potentiometer on the steering wheel controls this. Constant current is around 40-50A, and the batteries last around 30 minutes with an average speed of 10-15mph. It requires a small push to get started (really, the motor just has to be rotating) and accelerates extremely fast...This uses a sensorless brushless motor. They are not capable of starting under load. It may need a quick push before it can start. Dont try to start them under load. I already had one motor burn out because it stalled and the current burnt the coils insulation. Sensored motors overcome this problem."
Im sure if the Humboldt Microcontrollers Group ever wanted to build a similar kartduino, Ed and others in the group would have plenty of ideas and knowledge on how to improve the design, with sensored motors or an alternate solution to the sensorless brushless motors that burned out on the design shown in the Instructables.
Go-karts wooden electronics control box (from Instructables)

With regards to the MCU in this zippy little go-kart, the Hackaday post covers the different parts of the vehicle integrated with the Arduino.
"In addition to the throttle control, the Arduino is also responsible for other operational aspects of the vehicle. There are a bunch of LED lights that serve as headlights, tail lights, turn signals, brake lights and even one for a backup light. You may be wondering why an Arduino should be used to control something as simple as brake or headlights. [InverseCube] has programmed in some logic in the code that keeps the break lights on if the ESC brake function is enabled, if the throttle is below neutral or if the ESC enable switch is off. The headlights have 3 brightnesses, all controlled via PWM signal provided by the microcontroller. There is also an LCD display mounted to the center of the steering wheel. This too is controlled by the Arduino and displays the throttle value, status of the lights and the voltage of the battery."
An interesting alternative kartduino I ran across whilst doing research for this post is the
LOLrioKart (by MIT student)
LOLrioKart (see picture at left). This slightly-strange vehicle was created from a shopping cart by a Massachusetts Institute of Technology student. Might be handy for going on a quick trip to Wildberries or the Co-op for groceries.

Speaking of modern vehicles and the increasingly important roles played by MCUs in vehicles, maybe Ford, another vehicle manufacturer, a microcontroller manufacturer or an electronics distributor will in the future want to sponsor a Humboldt Microcontrollers Group project to design and build a modified version of Steve Salzmans vehicle, with upgrades that allow it to parallel park itself as well as generate and track all sorts of vehicle operation data. That will be a fun project!

**********
Read More..